Super Simple Easter Brunch!

Easter is early this year on April 5! If your menu isn’t planned yet, enlist some friends and get this easy brunch for a crowd together for Sunday!

Menu:

  • Ham
  • Egg Strata
  • Sweet Potato Tater Tots
  • Deviled eggs
  • Chilled Asparagus lemon salad
  • Fruit Salad
  • Sugar cookie and Dessert tray
  • Rolls for sandwiches
  • Biscuits
  • Condiments
  • Mimosas

Normally we purchase a Honey Baked Ham, of course you can’t go wrong there. Instead this year we are trying a ham from the famous New Braunfels Smokehouse). We’ll let you know how if it was a good decision!

HAPPY EASTER TO YOU AND YOURS!

One of my very favorite parts of the week is our weekend coffee ritual. We pull out the special cups saved for weekends only and go through the ritual of making pour over coffee. BF really has taken on the art that is pour over. For those of you who have not tried it, pour over creates a very smooth cup of coffee that is not oily like you get with a French press. Really, you get all the best out of the beans. Though I usually let BF take on the coffee making responsibility, I am learning to do it myself and even managed to make my own coffee when he was out of town. Just ask my college roommate, I never really learned to make coffee even in a regular old Mr. Coffee, so this is a HUGE step for me!

If you have a few minutes and a few tools, you too can have an extra special cup of coffee at home. We have learned that the process is important, but it is only as good as the ingredients and tools you use. We got a Hario pour over funnel, pot and kettle. The kettle really is an important key because it lets you be very precise when pouring the water. We also have our favorite beans from one of the local roasters. After trying a few versions, we think the filters that go with the set from Hario really do fit best. You can make others works, but those are the most consistent. Even spending a little more to get this done at home is way cheaper than a daily habit of picking it up! BF finds the process a good way to ease into the day and I get to benefit from the product!

Kelly


Pour Over Perfection

Begin by laying out all of your tools: the funnel, pot, grinder, beans, filter, scale, and kettle.


Fill the kettle with water and get it heating while you work on everything else.


Next, measure the beans to be ground. We use about 30g and have a measuring cup that is just right so I will admit we don’t use the scale every time. J Once they are measured, grind the beans and set aside. If you want to be really precise, you can also weigh the water as you make the coffee to keep you honest, but we have not taken to doing that regularly.


Take the filter and fold it along the seam so that it lays flat all around the cone, place the filter in the funnel.


Once the water is boiling, start by heating the pot with some hot water from the kettle and swirl it, then dump the water out to start with a warm receptacle.


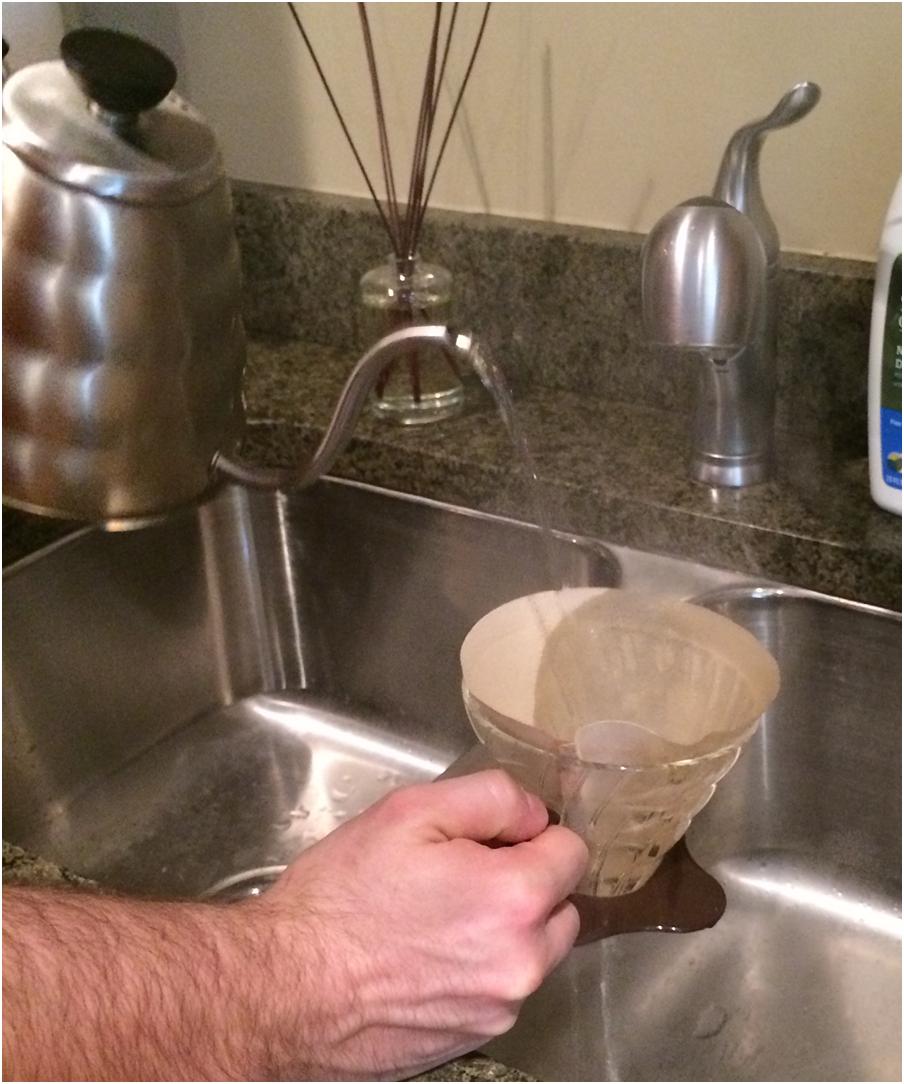
Next, rinse the filter…this is one that took me a while to learn, but you just have to wet the filter with the hot water to remove some of the paper taste and prep it for brewing.


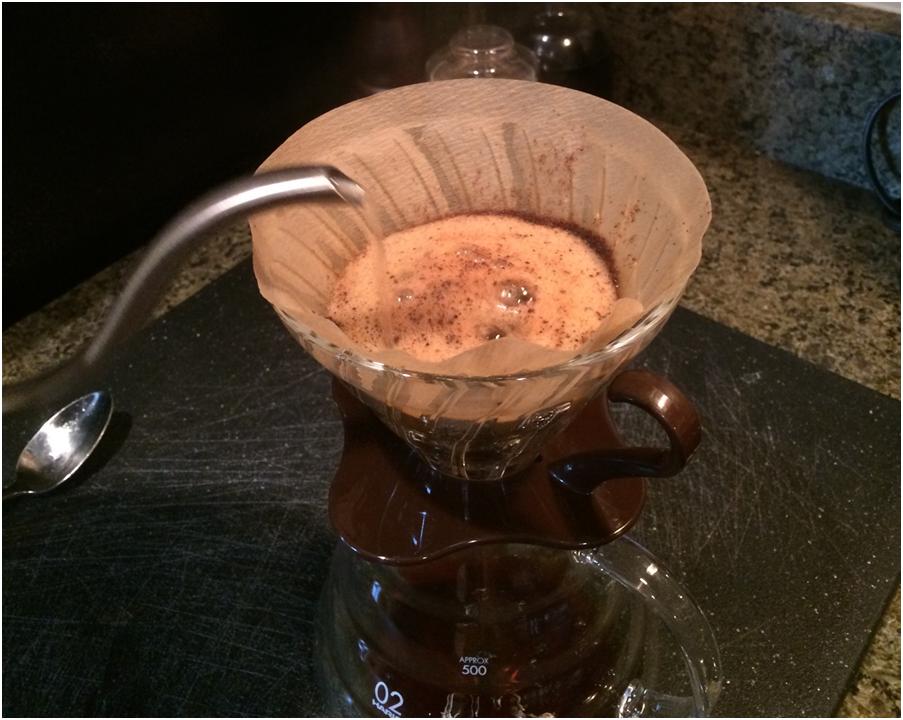
Add the ground coffee and use your thumb to make a small indentation in the middle. This allows the next step called the bloom to happen evenly. This is a step you don’t HAVE to include, but it helps focus your initial pour and get more constant in a hurry!


Pour the hot water right in the well you made just enough to cover the grounds. You will see bubbles start to form, this is the bloom getting the coffee started.


Now take a spoon and vigorously stir the bloom. This will help make sure there are no clumps in the grounds so you get an even brew.


As the water begins to drain, begin to pour again. Start in the center and work your way out in a spiral motion stopping short of getting all the way out to the filter. Add enough water to fill the cone about halfway. Allow to brew and add more water repeating the process before the grounds are completely dry.


One barista told me something I find helpful, think about controlling the kettle movement from your shoulder, not just from your arm and wrist…try it! It helps!


Once you reach about ½ of a brewed pot, you can take the water all the way to the top of the cone to finish it off.


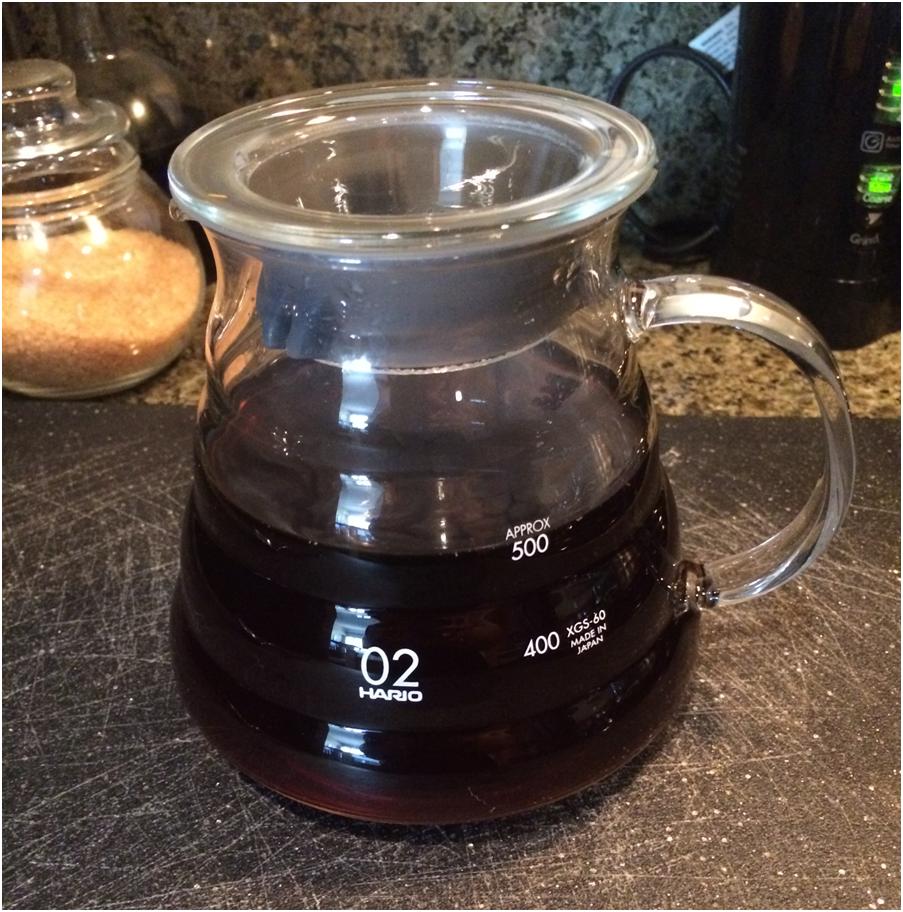
Pour yourself a cup and enjoy!!


Happy Labor Day! I have been on a healthy kick of late, but everyone needs a treat now and again, especially on a holiday! If you have a cheat day coming up (or just want an amazing treat!), put these on your list. (BF and I actually ended up just splitting one cookie and sharing the rest with our co-workers just to satisfy the craving). I think it is hard to beat the original Nestle Tollhouse recipe but these take chocolate chip cookies to a whole new level! Start with disks of Valrhona Dark Chocolate, add it to perfect dough, then use a unique technique to get a cookie soft in the middle and crunchy on the edges…can you say YUM?! These cookies are generous in size, so you may only get a dozen or so out of a batch. We have been searching for this recipe for over a year. The idea came from a mix that has now been discontinued. Be prepared to be patient and prep the dough ahead to allow to cool. These really are worth the wait!

Kelly


Ultimate Chocolate Chip Cookies

2 cups minus 2 Tablespoons of cake flour

1 2/3 cups bread flour

1 ½ teaspoons baking powder

1 ¼ teaspoons baking soda

1 teaspoon coarse salt (we used kosher)

2 ½ sticks softened butter

2 eggs

1 ¼ cups packed brown sugar

1 cup plus 2 Tablespoons granulated sugar

2 Tablespoons heavy cream or milk

2 Tablespoons pure vanilla extract

Pinch of pink salt

~2 cups dark chocolate disks (we found ours at Whole Foods and used 60% dark and 64% Valrhona disks)


  1. Sift together both kinds of flour, baking soda, and baking powder into a small bowl. Stir in coarse salt.
  2. In a large bowl, cream the butter and both kinds of sugar until fluffy.
  3. Blend in eggs, cream and vanilla. Fold in dry ingredients.
  4. Break up some of the chips in a food processor. You will end up with a variety of sizes with lots of whole disks. Think about what you like, but those disks will give you pockets of chocolate and some pretty decoration on the top! It will look like A LOT of chocolate, but ends up being just right.

  5. Cover tightly with plastic wrap and let chill in the refrigerator for 1-24 hours. Yes, 24 hours! We actually rushed it by putting this in the freezer for half an hour, but I think it is worth waiting the full 24.
  6. Preheat oven to 375°. Line two cookie sheets with a silpat or parchment paper.

  7. Scoop dough and form into disks (about 2-3″ in diameter). Stack a smaller disk on top of the bottom disk like you are building a snowman…the yummiest snowman ever! This is what really gives you the soft, gooey center with a crispy edge.
  8. Sprinkle each cookie lightly with pink salt. Chill another 10 minutes on the pan before baking.

  9. Bake one sheet at a time on the lowest rack for 13 minutes rotate 180° after 6 minutes.

  10. Look for a light blonde center with brown edges. (See the salt? That might be the biggest key to these!)

Grab a cold glass of milk and enjoy!

If you are like me, you are always looking for a healthy option you can make ahead for lunch. Quinoa always seems like a good healthy choice, but I haven’t really found a way I liked it…until now! This is light and fresh with lots of healthy additions. Bonus, it holds up really well all week! I like to make this on Sunday and it is just as good on Friday as it is on Monday. I love that I can eat it cold at my desk which makes life so easy. Let me know what you think!

Kelly

Cilantro Lime Quinoa

Ingredients:

2 cups uncooked quinoa

2 cups chicken stock

2 cups water

Juice and zest of 4-5 limes

2 Tablespoons honey

1 cup fresh cilantro, chopped

Kosher or sea salt

Pepper

1/2 cup extra virgin olive oil

6 scallions, thinly sliced (white and green parts)

2 red or yellow bell peppers, chopped

3 carrots, chopped

1 can black beans, drained and rinsed

2 grilled chicken breasts, chopped

Rinse quinoa 3 times to remove the bitter outside layer. Cook the quinoa with chicken stock and water (I add a little extra liquid because we are at high altitude). Bring the liquid to a boil then reduce to simmer for 30 seconds, bring back to a boil for another 30 seconds then reduce to a simmer for about 20 minutes until cooked through and tender. Allow to cool.

In a large bowl, whisk the lime juice with the zest, honey, a pinch or two of salt & pepper, and olive oil, until the dressing comes together. Add the cilantro and mix.

Add the chopped scallions, peppers, carrots, black beans, chicken, and quinoa and gently toss in the dressing.

Garnish with additional cilantro and lime zest, if desired. Eat immediately or pack up for lunches for the week. Great hot or cold!

I am a huge fan of stir fry; you can prep ahead of time (or even freeze in the marinade), it is a great way to clean out the fridge, it is usually healthy and everything goes in one pot! This is one that BF has been loving lately. This is a take-out-at-home kind of meal that will leave you satisfied for Chinese without all the extra fat. I usually add peppers to this, but it would be a great beef and broccoli substitute also. The sauce is sweet and salty and the cornstarch help to reduce everything to nicely cover the beef. I have not tried it with other types of meat, but I am sure that would be great too. As a freezer meal, I usually freeze it with the soy and cornstarch and freeze the sauce in a separate bag to be added at the right point. Flank steak is a great cut of meat that tends to be relatively inexpensive. It can be tough, so marinading it really helps. I have also found that the cornstarch really gives this a bit of extra help making it super tender. I like to cook the meat on pretty high heat (even though it can cause a bit of smoke and splatter) but I think it helps to sear the meat and keep it juicy on the inside. I did find a great tip last week: if you cut the steak when it is partially frozen, you can get super thin slices. A really good knife is on my wish list, but that is how I make due with what I have! This originally came from Guy’s Big Bite on the food network and I have tweaked it a bit over time. Try it out for an easy week night meal!

Kelly

Tangerine Beef

3 tablespoons soy sauce

1 tablespoon cornstarch

1 pound flank steak or tri-tip, cut in thin strips on the bias

1 bell pepper cleaned and sliced

2 tablespoons red wine vinegar

2 tablespoons hoisin sauce

2 tablespoons honey

2 tablespoons chili sauce

2 tablespoons soy sauce

1/4 cup freshly squeezed tangerine juice (sometimes I cheat and use tangerine juice from Whole Foods)

3 tablespoons olive oil

2 tablespoons minced fresh ginger

3 scallions, chopped

1/4 tangerine, zested

In a plastic bag combine the soy sauce and cornstarch and mix well. Add beef, cover, and let marinate for 20 minutes in the refrigerator.

Mix the sherry, hoisin, honey, chili sauce, soy sauce, and tangerine juice in a container and shake until combined.

In large pan or wok, heat oil on high. Add the ginger and beef and cook for 2 to 3 minutes. I like to do this in batches to get a really good sear, but you can do it all together if you have a great big pan!

Then add the veggies followed by the sauce mixture.

…and cook for another 2-5 minutes on medium heat until sauce thickens. See the bubbles?? J

Serve over brown rice and garnish with scallions and tangerine zest. Enjoy!

As I was making our Saturday morning eggs today, I got to thinking about learning to cook. More specifically, about what I think may be one of the most important things to learn in cooking, something that can take you from being a novice, to being a great cook. Three words: Mise En Place. All mise en place means is “to put in place.” In other words, gather and prepare everything you need. Have you ever started in on a recipe to get part way through and realize you needed to marinate something first or maybe peel the potatoes or maybe you are missing a key ingredient. So now you are stuck hurrying to clean them while you hope whatever you have in the pan doesn’t burn. By prepping ahead of time, you can be much more efficient. Why do you think cooking shows make things look so easy? When you have done all the tedious work ahead of time, you can make any recipe look easy!

I realized this morning that this is something I do now for things as simple as scrambled eggs. It has become a natural step for me. When you have a complicated recipe like beef bourguignon, or an elaborate layer cake, it makes sense to gather all your ingredients, but for eggs? Well, if you have all of your veggies chopped, garlic minced, eggs beaten, when you heat your pan, all you have to do is throw things in. You won’t be running to the fridge (or the store) to grab one more thing you desperately need. I even set up my kitchen in a way that some of my mise en place is always accessible. Things like olive oil, balsamic vinegar, and spices are always close at hand so I can grab them whenever I need them.

This concept also translates really well to prepping for your week. Remember when we talked about menu planning? I often go one step further and prep parts of my dinner recipes for the week. For example, I might slice and marinate my beef for stir fry, cook chicken ahead to throw in salad or tacos, blanch green beans. It is a way of putting parts of your mise en place together before you even need it, making you weeknight cooking much easier! I know when I walk in the door after a long day; I can usually still find a way to pull together a great meal when all I have to do is finish everything. If I don’t prep ahead there is a good chance I will just be grabbing take out on the way home.

Mary has always done this, especially when we know we need to make a bunch of things at once. You can always lay out dry ingredients separate from wet ingredients ahead of time and come back to them later. This is just one more way to make cooking much easier!

Do you have shortcuts that help you in the kitchen?

Kelly

Looking for a quick idea for Easter brunch? Look no further than a classic quiche! I think quiche is the perfect thing for brunch; you can make it ahead, put anything in it and it transports easily. Start with a great crust (or a premade one if you are really in a hurry!) add your favorite combination of ingredients, whip up your eggs and cream, pour into the shell and bake…that is it! We often make one with meat and one vegetarian. You will notice that we used a tart pan below, but a regular pie pan works great. I like the tart pan because you get a thinner piece of quiche (and I don’t really love eggs). Make sure to wrap the pan in aluminum foil so you don’t get a leaky quiche or get ready for a smoky kitchen! Below is one of our favorites but get creative with yours.

Take it to your brunch for a guaranteed hit! Happy Easter!

Kelly

Classic Quiche

1 pie crust

1 cup shredded sharp cheddar cheese

1 package frozen spinach, thawed and drained

8 oz sliced mushrooms, sautéed until tender

1 cup cream

3 eggs

Salt & pepper

Make a pie crust add pie weights to keep the crust from bubbling up and prebake at 425° for 20 minutes.

Allow the crust to cool a few minutes and then layer the ingredients into the crust.

Blend the eggs and cream with salt and pepper until combined. Pour the egg mixture into the crust.

Bake for 35-45 minutes at 375° until golden and cooked through.

Enjoy warm or room temperature.

Trader Joe’s opened over the weekend in Boulder. I’ve been waiting SO long. Since 1993, in fact. When I lived in Redondo Beach, I worked two doors down from TJ’s. Unfortunately, I was in San Francisco during the Boulder opening so I did my due diligence and asked everyone what they like to shop for at Trader Joe’s.

Here’s the consensus:


Sweets:

·      Soy Chocolate Ice cream

·      Biscotti

·      Chocolate Chip Cookies

·      Chocolate Bars

·      Cookie Butter (this is not one of ours, but I do not stop hearing about it)


Packaged foods:

·      Almonds (how are they so much better than other Almonds?)

·      Trail Mix

·      Fancy Crackers

·      Corn Salsa


Frozen:

·      Orange Chicken

·      Teriyaki Chicken

·      Brown Rice

·      Mac & Cheese

·      Edamame

·      Green Beans

In general, we think the frozen veggies and fruit are good


Toiletries:

·      Tea Tree products

·      Shaving Cream

·      Sponges

·      Vitamins


 Others:

·      Fresh Basil

·      Fresh Flowers

·      Bread

·      Broccoli Slaw with Carolina BBQ Sauce

·      Marinated Steak

·      Pesto Chicken

·      3 buck chuck (formerly two buck chuck) the couple I was sitting next to had people bring it to their wedding in Colorado. Not sure I’d put this on my own list.


Anything we missed?? Everyone finds their own Joe’s Gems. J

Mary


Boulder Trader Joe’s Post Opening Day Craziness